
nginx
全名engine x 开源软件 免费 高性能的http服务器和反向代理服务器,支持负载均衡以及TCP/UDP服务器,解决C10K问题
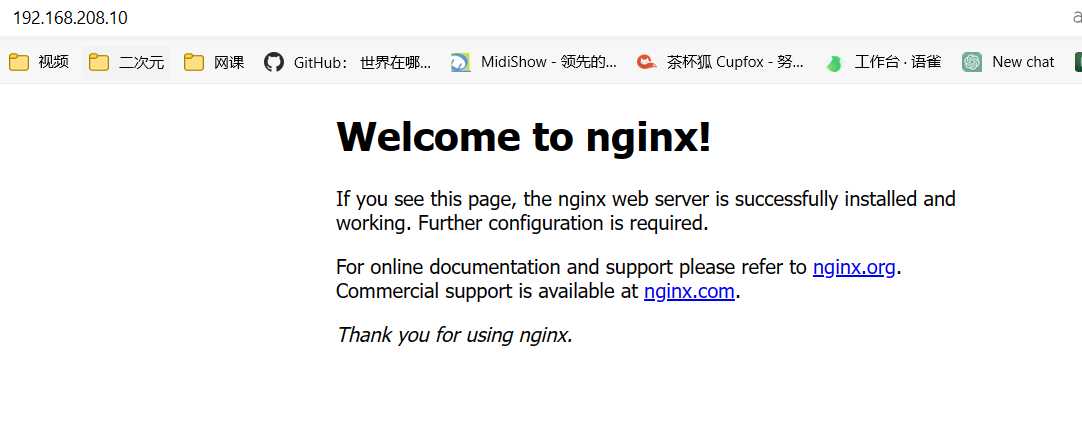
nginx官网
nginx是一个非盈利性组织的服务器、
淘宝曾开发过一款叫Tengine的一个服务器项目,它是基于nginx的二次开发,底层内核还是用的nginx
淘宝tengine官网
nginx功能介绍
- nginx用来处理静态资源js css html txt等资源
2.结合fastcgi可以进行动态资源的请求发送给php处理
3.http的反向代理
4.pop3协议的反向代理
5.tcp udp的请求转发
基础特性
模块化设计,较好的扩展性
高可靠性,远超apache
支持热部署 不停机更新配置文件,升级版本
低内存消耗 keep-alived
nginx采用异步网络IO模型:epoll模型
IO模型参考博客
web服务相关的特性
- 虚拟主机
2.支持keep-alived长连接
3.支持热部署
4.内存消耗小
5.访问日志
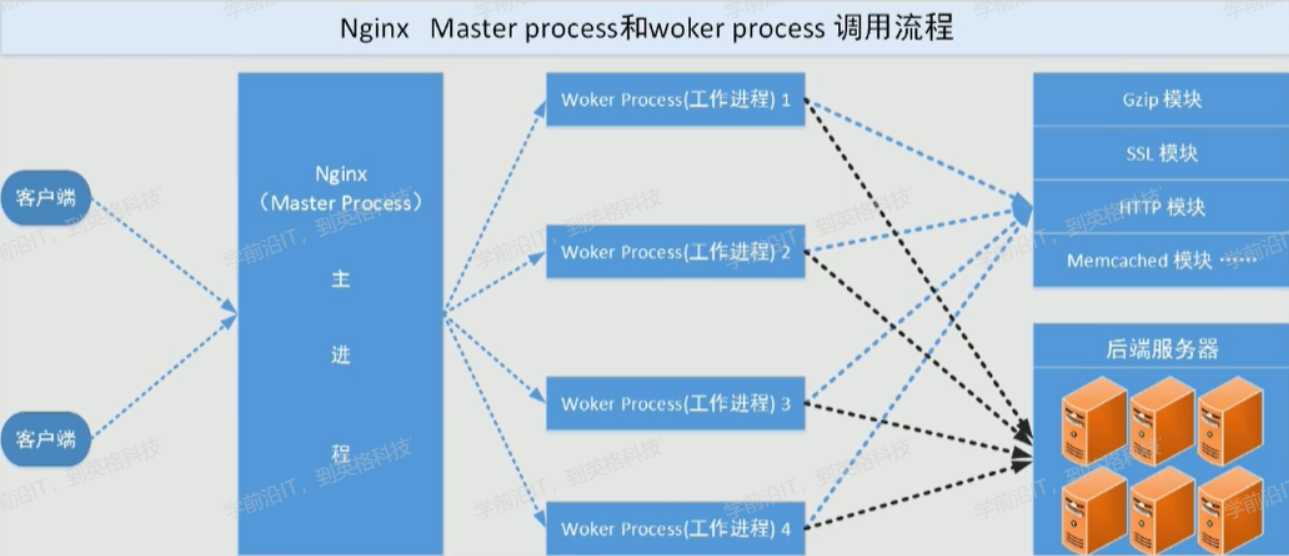
nginx架构和进程
nginx架构
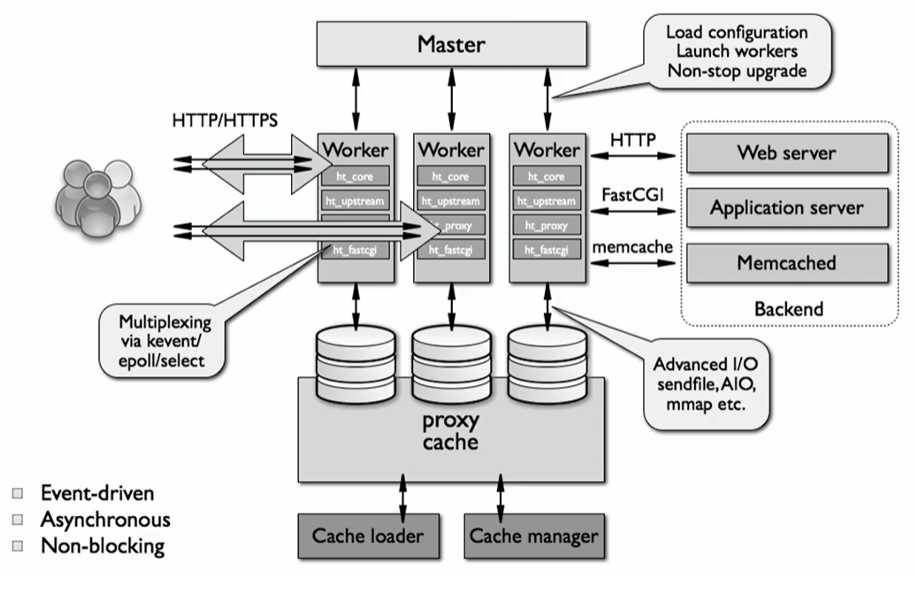
nginx进程
nginx进程通信
建立单项管道,工作进程来通信,有主进程问别的工作进程的状态
1. web请求处理机制
2.多进程方式
什么是多进程?
所谓的多进程就是客户端发送每发送一个请求给服务端,服务端的master进程就会fork一个子进程来响应服务端的请求,有点就是响应速度快,缺点也很明显,如果一次来了大量请求,会导致服务端资源短缺,无法向其他客户端发送资源
3.多线程方式
多线程方式呢需要的资源很少,相当于master进程派生一个子进程,子进程fork出多个线程,如此消耗的主机服务器资源少,但如果线程的主进程挂掉了话,这个子进程下的所有线程都会无法使用,并且这个子进程下的线程互相是可以访问的,隔离性差
nginx是一个多进程模型,但是也有线程
IO多路复用机制
单项管道的形式
主进程怎么知道子进程是不是工作结束了呢?
由监视文件描述符fd来通信
一个进程可以监视多个描述符fd
IO模型:
1.select 轮询 把监听的文件描述符全放一个数组里,数组最大存放1024
2.poll 轮询 解决了数组空间最大1024的限制 用的是链表
3.epoll 异步 触发event去通知
当然我们的nginx采用的肯定是epoll的IO多路复用模型啦!!!
nginx安装
nginx安装有两种形式,一种是yum安装,另一种是源码安装
各有各的有点,yum安装相对简单,但里面的模块啥的是固定死的,源码安装虽然需要编译麻烦,但在编译的过程钟可以客制化nginx。
nginx源码安装需要编译
所以我们用到了gcc编译器
nginx模块有的需要依赖第三方库
我们要安装pcre (支持rewrite) ,zlib (支持gzip模块) 和openssI (支持ssI模块)
yum安装nginx
yum info nginx #查看本机nginx的版本
yum install -y epel-release #安装epel扩展源
yum install -y nginx
systemctl enable --now nginx #打开并设置开机自启
源码安装nginx
[root@localhost ~]# wget https://nginx.org/download/nginx-1.18.0.tar.gz -P /usr/local/src/ # wget -P 指定下载路径
[root@localhost ~]# cd /usr/local/src
[root@localhost src]# tar xzvf nginx-1.18.0.tar.gz
[root@localhost src]# cd nginx-1.18.0
[root@localhost nginx-1.18.0]# ./configure --help
# 可以查看到编译的一些参数配置的帮助
tar
格式: tar [选项] [文件目录列表]
功能: 对文件目录进行打包备份
选项:
-c 建立新的归档文件
-r 向归档文件末尾追加文件
-x 从归档文件中解出文件
-O 将文件解开到标准输出
-v 处理过程中输出相关信息
-f 对普通文件操作
-z 调用gzip来压缩归档文件,与-x联用时调用gzip完成解压缩
-Z 调用compress来压缩归档文件,与-x联用时调用compress完成解压缩
一般解压用 tar -xzvf xxx.tar.gz
压缩打包 tar -czvf xxx.tar.gz xxx
编译安装
yum -y install gcc pcre-devel openssl-devel zlib-devel
#安装一些模块所需要的依赖库
useradd -r -s /sbin/nologin nginx
./configure --prefix=/apps/nginx \
--user=nginx \
--group=nginx \
--with-http_ssl_module \
--with-http_v2_module \
--with-http_realip_module \
--with-http_stub_status_module \
--with-http_gzip_static_module \
--with-pcre \
--with-stream \
--with-stream_ssl_module \
--with-stream_realip_module
make -j 2 && make install # 编译指定2核并安装
chown -R nginx:nginx /apps/nginx
ls /apps/nginx/
ln -s /apps/nginx/sbin/nginx /usr/bin/
which nginx
nginx -v
[root@localhost nginx-1.18.0]# tree /apps/nginx -C -L 1 查看一层目录下内容,加上颜色区分
/apps/nginx
├── conf nginx的配置文件
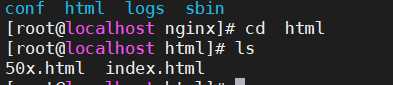
├── html 存放web文件 index.html默认页面 50x 默认错误页面
├── logs 存放访问日志和错误日志
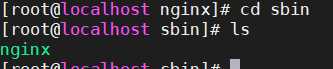
└── sbin 存放二进制执行文件 nginx启动脚本
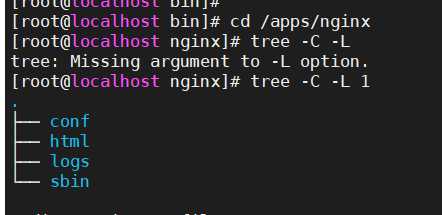

就是通过/apps/nginx/sbin/nginx来进行启动nginx的,所以要链接到环境变量中/usr/bin
启动和停止nginx
nginx
nginx -s stop
加入systemd里面
vim /usr/lib/systemd/system/nginx.service
[Unit]
Description=The nginx HTTP and reverse proxy server
Documentation=http://nginx.org/en/docs/
After=network.target remote-fs.target nss-lookup.target
Wants=network-online.target

[Service]
Type=forking
PIDFile=/apps/nginx/run/nginx.pid
ExecStart=/apps/nginx/sbin/nginx -c /apps/nginx/conf/nginx.conf
ExecReload=/bin/kill -s HUP MAINPID
ExecStop=/bin/kill -s TERMMAINPID

[Install]
WantedBy=multi-user.target
mkdir /apps/nginx/run
vim /apps/nginx/conf/nginx.conf
pid        /apps/nginx/run/nginx.pid;
验证nginx自启动文件
systemctl daemon-reload #重新加载配置文件
systemctl start nginx
systemctl enable nginx
ll /apps/nginx/run/
查看nginx配置文件
vim /app/nginx/conf/nginx.conf
worker_processes  1; #子进程数
pid /apps/nginx/run/nginx.pid;
events {
    worker_connections  1024; #工作进程最大连接数 1024
}
http {
    include       mime.types; #指定mine类型和文档
    default_type  application/octet-stream;
    sendfile        on; #文件输出设置
    keepalive_timeout  65; #超时时间65ms 长连接
    server {
        listen       80; #默认监听端口
        server_name  localhost; #主机名
        location / {
            root   html;  #默认访问的根目录/apps/nginx/html
            index  index.html index.htm; #默认显示的页面
        }
        error_page   500 502 503 504  /50x.html; #错误后指向        location = /50x.html {
            root   html;
        }
    }
}
nginx配置模块详解
main全局配置
cpu性能优化
user    nginx nginx;    #启动Nginx工作进程的用户和组
worker_processes [number | auto];   #启动Nginx工作进程的数量,一般设为和CPU核心数相同
worker_processes 4
worker_cpu_affinity 0001 0010 0100 1000;  # 将Nginx工作进程绑定到指定的CPU核心,默认Nginx是不进行进程绑定的,绑定并不是意味着当前nginx进程独占一核心CPU,但是可以保障此进程不会运行在其他核心上,这就极大减少了nginx的工作进程在不同的cpu核心上的来回跳转,减少了cpu对进程的资源分配与回收以及内存管理等,因此可以有效的提升nginx服务器的性能。
CPU MASK:0001    0号CPU
          0010    1号CPU
          0100    2号CPU
          1000    3号CPU
[root@localhost ~]# watch -n.5 'ps axo pid,cmd,psr |grep nginx'
# 查看nginx进程对应的CPU
  6834 nginx: master process /apps   2
 47621 nginx: worker process         0
 47622 nginx: worker process         1
 47623 nginx: worker process         2
 47624 nginx: worker process         3
[root@localhost ~]# while true;do ab -c 1000 -n 2000 http://127.0.0.1/;done
# 压力测试
错误日志配置
# 错误日志记录配置,语法:error_log file [debug | info | notice | warn | error | crit | alert |emerg]
# error_log logs/error.log;
# error_log logs/error.log notice;
[root@localhost conf]# vim /apps/nginx/conf/nginx.conf
error_log /apps/nginx/logs/error.log error;
工作优先级与文件并发数
[root@localhost conf]# vim /apps/nginx/conf/nginx.conf
worker_priority 0;   #工作进程优先级(-20~19)
worker_rlimit_nofile 65536;     #所有worker进程能打开的文件数量上限,包括:Nginx的所有连接(例如与代理服务器的连接等),而不仅仅是与客户端的连接,另一个考虑因素是实际的并发连接数不能超过系统级别的最大打开文件数的限制,最好与ulimit -n的值保持一致
[root@localhost ~]# ulimit -n 102400
[root@localhost ~]# vim /etc/security/limits.conf
*        soft    nofile    102400
*        hard    nofile    102400

# 查看优先级
[root@localhost ~]# watch -n.5 'ps axo pid,cmd,psr,nice |grep nginx'
其他优化配置
daemon off;    # 前台运行nginx服务,用于测试、docker等环境
master_process off|on;    # 是否开启Nginx的master-worker工作模式,仅用于开发调试场景,默认为on
events {
  worker_connections 65536;    # 设置单个工作进程的最大并发连接数
  use epoll;    # 使用epoll事件驱动,Nginx支持众多的事件驱动,比如:select、poll、epoll,只能设置在events模块中
  accept_mutex on;  # on为同一时刻一个请求轮流由work进程处理,而防止被同时唤醒所有worker,避免多个睡眠进程被唤醒的设置,默认为off,新请求会唤醒所有worker进程,此过程也被称为"惊群",因此nginx刚安装完以后要进行适当的优化,建议设置为on
  multi_accept on;  # on时Nginx服务器的每个工作进程可以同时接受多个新的网络连接,此指令默认为off,即默认为一个工作进程只能一次接受一个新的网络连接,打开后几个同时接受多个,建议设置为on
}
http模块
http{
    server{} 每个server用来定义一个虚拟主机
    server{
        server_name #虚拟主机名;
        root #主目录;
        location / {
            root  html; #根目录
            index index.html index.htm;
        }
    }
}
http协议配置说明
http{
    include mime.types; #导入支持的文件类型,是相对于/apps/nginx/conf
    default_type  application/octet-stream;    # 除mime.types中文件类型外,设置其他文件默认类型,访问其他类型时会提示下载不匹配的类型文件
        # 日志配置部分
    #log_format  main  'remote_addr -remote_user [time_local] "request" '
    #                  'statusbody_bytes_sent "http_referer" '
    #                  '"http_user_agent" "$http_x_forwarded_for"';
    #access_log  logs/access.log  main;
    # 自定义优化参数
    sendfile on;  # 允许sendfile方式传输文件 ,sendfile系统调用在两个文件描述符之间直接传递数据(完全在内核中操作),从而避免了数据在内核缓冲区和用户缓冲区之间的拷贝,操作效率很高,被称之为零拷贝。# 允许sendfile方式传输文件 ,sendfile系统调用在两个文件描述符之间直接传递数据(完全在内核中操作),从而避免了数据在内核缓冲区和用户缓冲区之间的拷贝,操作效率很高,被称之为零拷贝。
    #tcp_nopush on;#在开启了sendfile的情况下,合并请求后统一发送给客户端
    #tcp_nodelay off;#在开启了keepalived模式下的连接是否启用TCP_NODELAY选项,当为off时,延迟0.2s发送,默认on时,不延迟
    #keepalive_timeout 0;
    keepalive_timeout 65 65;# 设置会话保持时间,第二个值为响应首部:keep-Alived:timeout=65,可以和第一个值不同
    #gzip on;#开启文件压缩

    server {
      listen 80;# 设置监听端口
      server_name localhost;# 设置server name,可以空格隔开写多个,并支持正则表达式,如:*.iproute.cn(泛域名)
    }
}
指定相应报文server首部
# 如果想自定义响应报文的nginx版本信息,需要修改源码文件,重新编译
# 如果server_tokens on,修改 src/core/nginx.h 修改第13-14行,如下示例
#define NGINX_VERSION "1.68.9"
#define NGINX_VER "mynginx" NGINX_VERSION
如果server_tokens off, 修改 src/http/ngx_http_header_filter_module.c
第49行,如下示例:
static char ngx_http_server_string[] = 'Server: nginx' CRLF;
把其中的nginx改为自己想要的文字即可,如mynginx
[root@localhost ~]# vim /usr/local/src/nginx-1.18.0/src/core/nginx.h
# define NGINX_VERSION    "1.68.9"
# define NGINX_VER        "mynginx/" NGINX_VERSION
[root@localhost ~]# vim /usr/local/src/nginx-1.18.0/src/http/ngx_http_header_filter_module.c
static u_char ngx_http_server_string[] = "Server: mynginx" CRLF;

修改完成后重新编译
[root@localhost ~]# cd /usr/local/src/nginx-1.18.0
[root@localhost nginx-1.18.0]# ./configure --prefix=/apps/nginx \
--user=nginx \
--group=nginx \
--with-http_ssl_module \
--with-http_v2_module \
--with-http_realip_module \
--with-http_stub_status_module \
--with-http_gzip_static_module \
--with-pcre \
--with-stream \
--with-stream_ssl_module \
--with-stream_realip_module
[root@localhost nginx-1.18.0]# make -j 2 && make install
[root@localhost nginx-1.18.0]# systemctl restart nginx
[root@localhost nginx-1.18.0]# curl -I 127.0.0.1
核心配置示例
基于不同的ip 不同的域名 不同的端口实现的虚拟主机依靠的是ngx_http_core_module模块
pc站与手机站
定义主配置文件里加入子配置文件的include,编写配置文件 配置文件语句结束的标志是分号,一定要记得加分号
vim /apps/nginx/conf/nginx.conf
http{
....
include ./apps/nginx/conf.d/*.conf;
}
创建pc站
vim /apps/nginx/conf.d/pc.conf
server{
    listen 80;
    server_name www.pc.com;
    location / {
        root /apps/nginx/html/www;
        index index.html index.htm;
    }
mkdir /apps/nginx/html/www
cd /apps/nginx/html/www
echo "hello pc" > index.html
编写完配置文件要重启下nginx
先用nginx -t检测配置文件完整性 出现successfull说明没问题
重启 systemctl restart nginx
编写一下hosts文件
192.168.208.10 www.pc.com
}

创建移动站
vim /apps/nginx/conf.d/mobile.conf
server{
    listen 80;
    server_name m.test.com;
    location / {
        root /apps/nginx/html/mobile;
        index index.html index.htm;
    }
}
mkdir /apps/nginx/html/mobile
echo "hello mobile" >  /apps/nginx/html/mobile/index.html;
systemctl restartnginx #重新加载nginx
#编写hosts文件进行主机内部的域名解析

root与alias
什么是root 文件的家目录 我们在定义location的时候访问网页默认的路径是root+location后的地址
[root@localhost conf]# vim /apps/nginx/conf.d/test.conf

server {
  listen 80;
  server_name a.test.com;
  location / {
    root /apps/nginx/html/www;
  }

  location /about {    # 注意about后不要加/,使用alias的时候uri后面加了斜杠,下面的路径也必须加,不然403错误
    alias /apps/nginx/html/about;    # 当访问about的时候,会显示alias定义的/apps/nginx/html/about里面的内容
  }
}
# 重启Nginx并访问测试
[root@localhost about]# curl  a.test.com/about/
location模块
类似防火墙的功能 ngx_http_access_module模块
nginx四层访问控制
[root@www static3]# vim /apps/nginx/conf.d/test.conf
server {
  listen 80;
  server_name a.test.com;
 location / {
    root /apps/nginx/html/www;
 location = /1.jpg {
  index index.html;
  root /apps/nginx/html/static1;
  allow 192.168.175.10; #允许10虚拟机访问
  deny all; #禁止其他的访问
}
}
}
#禁止了主机访问,虚拟机本机可以访问刚才的1.jpg
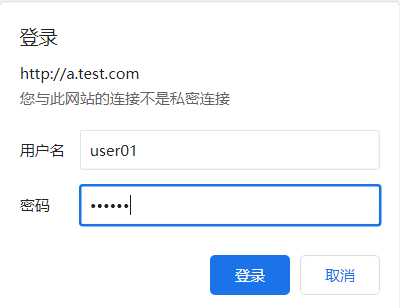
nginx账号认证
ngx_http_auth_basic_module模块提供此功能
[root@localhost ~]# htpasswd -cb /apps/nginx/conf/.htpasswd user01 123456
[root@localhost ~]# htpasswd -b /apps/nginx/conf/.htpasswd user2 123456
[root@localhost ~]# tail /apps/nginx/conf/.htpasswd
[root@www static3]# vim /apps/nginx/conf.d/test.conf
server {
  listen 80; #监听端口80
  server_name a.test.com; #主机名
  auth_basic "login password"; #基础认证 登录密码
  auth_basic_user_file /apps/nginx/conf/.htpasswd;
location = / {
  index index.html;
  root /apps/nginx/html/mobile;
}
}

自定义错误界面
[root@www static3]# vim /apps/nginx/conf/nginx.conf
server {
listen 80;
server_name a.test.com;
error_page 500 502 503 504 /error.html; #指定如果出现这些错误跳转到哪里
location = /error.html {
  root html;
}
[root@www static3]# vim /apps/nginx/conf.d/test.conf
server {
  listen 80;
  server_name a.test.com;
  auth_basic "login password";
  auth_basic_user_file /apps/nginx/conf/.htpasswd;
  error_page 404 /40x.html; #如果404,就跳转到/apps/nginx/html/40x.html
location = /1.jpg {
  index index.html;
  root /apps/nginx/static1;
}
[root@www html]# echo "<h1>404 not found</h1>" > /apps/nginx/html/40x.html
error_page /index.html;
#如果404 就跳转到首页
自定义错误日志
[root@www static3]# vim /apps/nginx/conf/nginx.conf
server{
...
error_page 500 502 503 504 404 /error.html;
access_log /apps/nginx/logs/a_test_access.log;
error_log /apps/nginx/logs/a_test_error.log;
location = /error.html {
  root html;
}
访问不存在的资源会出现404的报错

长连接
[root@www html]# vim /apps/nginx/conf/nginx.conf
http {
...
keepalive_requests 3;
keepalive_timeout 65 60;
# 开启长连接后,返回客户端的会话保持时间为60s,单次长连接累计请求达到指定次数请求或65秒就会被断开,后面的60为发送给客户端应答报文头部中显示的超时时间设置为60s,如不设置客户端将不显示超时时间。
keep-Alive:timeout=60;
# 浏览器收到的服务器返回的报文
# 如果设置为keepalive_timeout 0表示关闭会话保持功能,将如下显示:
Connection:close  # 浏览器收到的服务器返回的报文
# 使用命令测试
[root@www html]# telnet a.test.com 80
Trying 192.168.208.10...
Connected to a.test.com.
Escape character is '^]'.
GET / HTTP/1.1
HOST: a.test.com
作为下载服务器
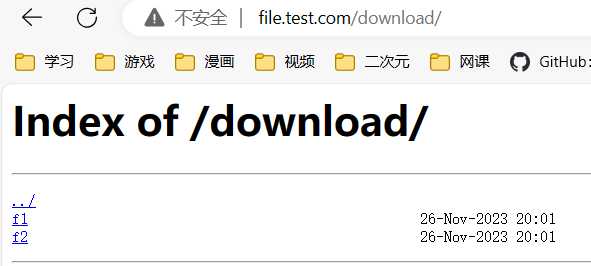
ngx_http_autoindex_module模块
root@localhost ~]# mkdir -p /apps/nginx/html/www/download
[root@www ~]# cd /apps/nginx/html/www/download
[root@www download]# touch f1
[root@www download]# touch f2
[root@localhost ~]# vim /apps/nginx/conf.d/www.conf
server {
  listen 80;
  server_name file.test.com;
location /download {
  autoindex on;    # 自动索引功能,开启才会展示出文件列表
  autoindex_exact_size off;    # 关闭详细文件大小统计,让文件大小显示MB,GB单位,默认为b
  autoindex_localtime on;    # on表示显示本机时间
  limit_rate 1024k;      # 限速,默认不限速
  root /apps/nginx/html/www;
  }
}
修改hosts
file.test.com 192.168.175.10
测试http://file.test.com/download/
nginx同样支持对磁盘文件进行缓存
open_file_cache on;    # 是否缓存打开过的文件信息
open_file_cache max=N [inactive=time];
#nginx可以缓存以下三种信息:
#1. 文件元数据,文件的描述符,文件大小和最近一次的修改时间
#2. 打开的目录结构
#3. 没有找到的或者没有权限访问的文件相关信息
max=N;    # 可缓存的缓存项上限数量;达到上限后会使用LRU(Least recently used,最近最少使用)算法实现管理
inactive=time;    # 缓存项的非活动时长,在此处指定的时长内未被命中的或命中的次数少于open_file_cache_min_uses指令所指定的次数的缓存项即为非活动项,将被删除
open_file_cache_valid time;  #缓存项有效性的检查验证频率,默认值为60s
open_file_cache_errors on | off;   #是否缓存查找时发生错误的文件一类的信息,默认值为off
open_file_cache_min_uses number;   # open_file_cache指令的inactive参数指定的时长内,至少被命中此处指定的次数方可被归类为活动项,默认值为1
实例:
open_file_cache max=10000 inactive=60s;
open_file_cache_vaild 60s;
open_file_cache_min_uses 5;
open_file_cache_errors off;
nginx高级配置
nginx状态页
基于nginx模块ngx_http_stub_status_ module实现,在编译安装nginx的时候需要添加编译参数--with-http_stub_status_module,否则配置完成之后监测会是提示语法错误
注意:状态页显示的是整个服务器的状态,而非虚拟主机的状态
[root@www ~]# vim /apps/nginx/conf.d/www.conf
location /nginx_status {
  stub_status on;
  auth_basic "auth login";
  auth_basic_user_file /apps/nginx/conf/.htpasswd;
  allow 192.168.0.0/16;
  allow 127.0.0.1;
  deny all;
}
http://file.test.com/nginx_status
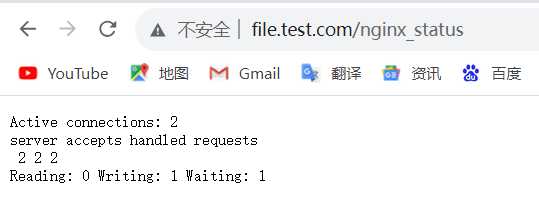
Active connections: 2 表示Nginx正在处理的活动连接数2个。
server 2 表示Nginx启动到现在共处理了2个连接
accepts 2 表示Nginx启动到现在共成功创建2次握手
handled requests 2 表示总共处理了 2 次请求
Reading:Nginx 读取到客户端的 Header 信息数,数值越大,说明排队越长,性能不足
Writing:Nginx 返回给客户端 Header 信息数,数值越大,说明访问量越大
Waiting:Nginx 已经处理完正在等候下一次请求指令的驻留链接(开启keep-alive的情况下,这个值等于Active-(Reading+Writing))
nginx第三方模块
需要在编译安装Nginx的时候使用参数--add-module=PATH指定路径添加
[root@www nginx-1.18.0]# vim /apps/nginx/conf.d/www.conf
location /main {
     index index.html;
     default_type text/html;
     echo "hello world,main-->";
     echo remote_addr;
     echo_reset_timer;    # 将计时器开始时间重置为当前时间
     echo_location /sub1;
     echo_location /sub2;
     echo "tookecho_timer_elapsed sec for total.";
}
location /sub1 {
     echo_sleep 2;
     echo hello;
}
location /sub2 {
     echo_sleep 1;
     echo world;
}
[root@localhost ~]#
[root@localhost src]# wget https://github.com/openresty/echo-nginx-module/archive/refs/heads/master.zip
[root@www src]# unzip master.zip
[root@www src]# mv echo-nginx-module-master echo-nginx-module
[root@localhost src]# cd nginx-1.18.0
[root@localhost nginx-1.18.0]# ./configure --prefix=/apps/nginx \
--user=nginx \
--group=nginx \
--with-http_ssl_module \
--with-http_v2_module \
--with-http_realip_module \
--with-http_stub_status_module \
--with-http_gzip_static_module \
--with-pcre \
--with-stream \
--with-stream_ssl_module \
--with-stream_realip_module \
--add-module=/usr/local/src/echo-nginx-module
[root@localhost nginx-1.18.0]# make -j 2 && make install
http://file.test.com/main

nginx变量使用
nginx变量在配置文件中应用,变量有内置变量和自定义变量,nginx变量可以用在访问客户端信息的时候
内置变量
官方文档:https://nginx.org/en/docs/varindex.html
$remote_addr;
# 存放了客户端的地址,注意是客户端的公网IP
$proxy_add_x_forwarded_for;
# 此变量表示将客户端IP追加请求报文中X-Forwarded-For首部字段,多个IP之间用逗号分隔,如果请求中没有X-Forwarder-For,就使用$remote_addr
$args;
# 变量中存放了URL中的参数
$document_root;
# 保存了针对当前资源的系统根目录
$document_uri;
# 保存了当前请求中不包含参数的URI,注意是不包含请求的指令,比如/img/logo.png
$host;
# 存放了请求的host名称
limit_rate 10240;
echo $limit_rate;
# 如果nginx服务器使用limit_rate配置了显示网络速率,则会显示,如果没有设置,则显示0
$remote_port;
# 客户端请求Nginx服务器时随机打开的端口,这是每个客户端自己的端口
$remote_user;
# 已经经过Auth Basic Module验证的用户名
$request_body_file;
# 做反向代理时发给后端服务器的本地资源的名称
$request_method;
# 请求资源的方式,GET/PUT等等
$request_filename;
# 当前请求的资源文件的磁盘路径,由root或alias指令与URL请求生成的文件绝对路径
# /apps/nginx/html/www/index.html
$request_uri;
# 包含请求参数的原始URI,不包含主机名,相当于:$document_uri?$args
$scheme;
# 请求的协议,例如:http,https,ftp等等
$server_protocol;
# 保存了客户端请求资源使用的协议版本,例如:HTTP/1.0,HTTP/1.1,HTTP/2.0等等
$server_addr;
# 保存了服务器的IP地址
$server_name;
# 请求的服务器的主机名
$server_port;
# 请求的服务器的端口号
$http_<name>
# name为任意请求报文首部字段,表示记录请求报文的首部字段
$http_user_agent;
# 客户端浏览器的详细信息
$http_cookie;
# 客户端的cookie信息
$cookie_<name>
# name为任意请求报文首部字段cookie的key名
自定义变量
vim /apps/nginx/conf.d/aaa.conf
    set name zs;
    echoname;
    set my_portserver_port
    echo myport
    echo "server_name:$server_port";

nginx自定义访问日志
nginx的访问日志是用来存放不同的客户端请求nginx资源留下来的痕迹,不像error_log,访问日志可以对与每个server都定义一个访问日志,其中access_log 存放访问日志的地址 log_format存放访问日志的格式,要存放什么类型的内容
[root@www ~]# vim /apps/nginx/conf/nginx.conf
log_format  nginx_format1  'remote_addr -remote_user [time_local] "request" '
                  'statusbody_bytes_sent "http_referer" '
                  '"http_user_agent" "http_x_forwarded_for"'
                  'server_name:$server_port';
access_log  logs/access.log  nginx_format1;
# 重启nginx并访问测试日志格式
# /apps/nginx/logs/access.log

很好的用到了nginx的内置变量,相当于用log format定义一个模块,然后在模块里塞入变量最后输出到访问日志内部
自定义默认格式
如果要保留日志的源格式,只需要添加相应的内容
[root@www ~]# vim /apps/nginx/conf/nginx.conf
log_format  nginx_format1  'remote_addr -remote_user [time_local] "request" '
                  'statusbody_bytes_sent "http_referer" '
                  '"http_user_agent" "http_x_forwarded_for"'
                  'server_name:$server_port';
access_log  logs/access.log  nginx_format1;
# 重启nginx并访问测试日志格式
# /apps/nginx/logs/access.log
自定义json格式的访问日志
为什么?
普通的访问日志展示出来的信息过于少,不利于后期运维人员进行运维工作,所以我们log format指定一个新的json格式模块
log_format access_json '{"@timestamp":"time_iso8601",'
  '"host":"server_addr",'
  '"clientip":"remote_addr",'
  '"size":body_bytes_sent,'
  '"responsetime":request_time,'
  '"upstreamhost":"upstream_response_time",'
  '"upstreamhost":"upstream_addr",'
  '"http_host":"host",'
  '"uri":"uri",'
  '"xff":"http_x_forwarded_for",'
  '"referer":"http_referer",'
  '"tcp_xff":"proxy_protocol_addr",'
  '"status":"$status"}';
access_log  logs/access.log  access_json;

nginx压缩模块
依赖于模块ngx_http_gzip_module
# 启用或禁用gzip压缩,默认关闭
gzip on | off;
# 压缩比由低到高1到9,默认为1
gzip_comp_level level;
# 禁用IE6 gzip功能
gzip_disable "MSIE [1-6]\.";
# gzip压缩的最小文件,小于设置值的文件将不会压缩
gzip_min_length 1k;
# 启用压缩功能时,协议的最小版本,默认HTTP/1.1
gzip_http_version 1.0 | 1.1;
# 指定Nginx服务需要向服务器申请的缓存空间的个数和大小,平台不同,默认:32 4k或者 16 8k;
gzip_buffers number size;
# 指明仅对哪些类型的资源执行压缩操作,默认为gzip_types text/html,不用显示指定,否则出错
gzip_types mime-type ...;
# 如果启用压缩,是否在相应报文首部插入"vary: Accept-Encoding",一般建议打开
gzip_vary on | off
# 重启nginx并进行访问测试压缩功能
[root@localhost ~]# curl -I --compressed 127.0.0.1
https功能
https其实就是http+SSL/TLS,一般一些大型的企业服务器网站银行网站等为了避免私密信息被人爬取到,一般会采用这种https加密传输信息,服务端和客户端之间通过TLS进行加密数据,ssl其实是一个组织颁发的证书
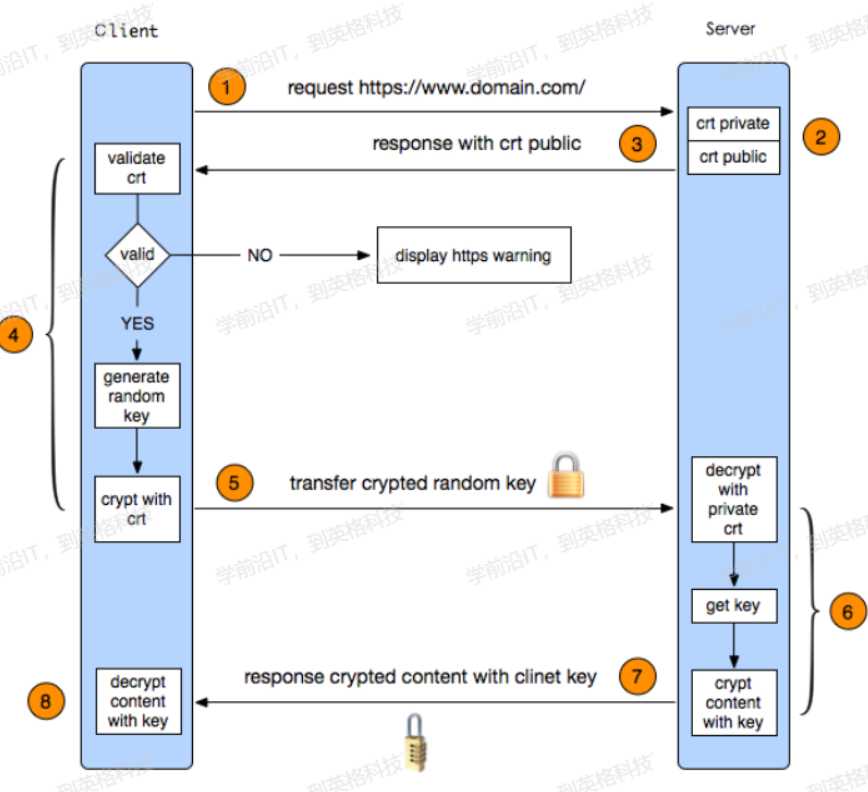
https实现过程
客户端发起https请求
https端口是443 http端口是80
https有一套SSL证书,可以向相关组织申请,或者也可以自己颁发,但是自己颁发,一般浏览器访问会提示证书不可信
证书其实是一对公钥和私钥,服务端向客户端发送公钥,里面包含了很多信息,包括颁发机构,认证时间等
客户端解析公钥 自己生成一个加密后的随机值,其实就是私钥,自己保存一份,然后发送给服务端
服务端用私钥加密数据传输给客户端,客户端解析公钥,公钥配对成功,用私钥对这个加密数据进行解密
除非别人能拿到这个随机值的私钥,要不然不可能知道你们之间传输的数据具体内容
http使用的模块
ngx_http_ssl_module 利用这个模块进行自己办法证书
ssl on | off;
listen 443 ssl;
# 为指定的虚拟主机配置是否启用ssl功能,此功能在1.15.0废弃,使用listen [ssl]替代。
ssl_certificate /path/to/file;
# 当前虚拟主机使用使用的公钥文件,一般是crt文件
ssl_certificate_key /path/to/file;
# 当前虚拟主机使用的私钥文件,一般是key文件
ssl_protocols [SSLv2] [SSLv3] [TLSv1] [TLSv1.1] [TLSv1.2];
# 支持ssl协议版本,早期为ssl现在是TSL,默认为后三个
ssl_session_cache off | none | [builtin[:size]] [shared:name:size];
# 配置ssl缓存
    off:
    # 关闭缓存
    none:
    # 通知客户端支持ssl session cache,但实际不支持
    builtin[:size]:
    # 使用OpenSSL内建缓存,为每worker进程私有
    [shared:name:size]:
    # 在各worker之间使用一个共享的缓存,需要定义一个缓存名称和缓存空间大小,一兆可以存储4000个会话信息,多个虚拟主机可以使用相同的缓存名称。
ssl_session_timeout time;
# 客户端连接可以复用ssl session cache中缓存的有效时长,默认5m
自己颁发证书
生成ca证书
cd /apps/nginx
mkdir certs && cd certs
openssl req -newkey rsa:4096 -nodes -sha256 -keyout ca.key -x509 -days 3650 -out ca.crt
生成证书请求文件
openssl req -newkey rsa:4096 -nodes -sha256 -keyout iproute.cn.key -out iproute.cn.csr
签发证书
openssl x509 -req -days 36500 -in iproute.cn.csr -CA ca.crt -CAkey ca.key -CAcreateserial -out iproute.cn.crt
cat iproute.cn.crt ca.crt > iproute.crt
验证证书内容
openssl x509 -in iproute.cn.crt -noout -text
nginx证书配置
vim /apps/nginx/conf/nginx.conf
server {
  listen 80;
  listen 443 ssl;
  ssl_certificate /apps/nginx/certs/iproute.crt;
  ssl_certificate_key /apps/nginx/certs/iproute.cn.key;
  ssl_session_cache shared:sslcache:20m;
  ssl_session_timeout 10m;
  root /apps/nginx/html;
}

自己颁发的证书 会显示证书不安全
虚拟主机
[root@www conf.d]# ll /apps/nginx/conf.d
总用量 12
-rw-r--r--. 1 root root 107 9月  25 16:45 bbs.conf
-rw-r--r--. 1 root root 109 9月  25 16:45 blog.conf
-rw-r--r--. 1 root root 107 9月  25 16:44 www.conf
[root@www conf.d]# cat *.conf
server {
listen      *:8080;
server_name bbs.eagle.com;
location / {
root /apps/html/bbs;
index index.html;
}
}

server {
listen      *:8080;
server_name blog.eagle.com;
location / {
root /apps/html/blog;
index index.html;
}
}

server {
listen      *:8080;
server_name www.eagle.com;
location / {
root /apps/html/www;
index index.html;
}
}

默认是80端口 要写8080
Comments NOTHING